
|
|
ROLEXROLEXROLEXROLEXROLEXROLEX
 ROLEXROLEXROLEXROLEXROLEXROLEX
 7 May 2014, 03:01 AM
|
#1 |
|
2024 Pledge Member

Join Date: Feb 2014
Real Name: John Baker III
Location: Spring,Texas
Watch: 1971 Red Sub
Posts: 2,221
|
Bezels, Inserts, and Pain
Hey Guys:
I have talked about this before, but some of the original Rolex inserts, and most of the after-markets, can be a real pain to "re-insert" after they come apart from the bezel. I had 2 sets of inserts/bezels sitting on my bench; I spent over an hour screwing around with them trying to get them back together. I re-read Jocke's thread, but still nothing but sore thumbs. I have a little engineering in my background and decided to re-think the whole idea behind this piece of watchmaking. Basically, the bezel and insert are "force fits"; that is they both have almost identical dimensions where they meet. The only way to mate them at the factory (in an efficient manner) would be to have a "Precision Mini Press" setup..... So....I took my desktop case-back press and found a set of nylon pieces that were close to, but bigger than my bezel and insert (Pepsi GMT 16750). Then I borrowed a friend's mini-lathe to do the machine work needed. I wanted the bottom piece to hold the bezel firmly in place during the press....I cut it down to 35.95 mm. Perfect; the bottom lip of the bezel slipped onto the disk and hardly moved. Next, I machined the top piece (it had a beveled edge already) down to 37.40 mm. That dimension was just smaller than the top of the bezel lip and rested on the outer edge of the insert. I assembled everthing on the press and squeezed gently. They went together so smoothly, they didn't even click! When I looked at the unit under magnification, the insert was flush with the bottom of the bezel lip. I couldn't believe that it worked so well; 10 seconds of alignment and a little pressure did what I couldn't do in an hour of frustrating work!! The top disk was left a little loose on the screw; this allowed for "self-leveling" as it came into contact with the insert. And, because the disks are nylon, they didn't scatch any of the parts in the process.... OK...so I checked the new press parts with my 16610 and it worked on that set too. I'm sure that the 5512/5513 will be another round at the lathe, but at least I know what has to be done now.... Bottom Line: Here are the pics if you want to attempt this yourself. If you have a problem set and don't want to screw with it, private message me. I would be more than happy to get yours back together (no charge) ! 
|

|

|
|
7 May 2014, 03:35 AM
|
#2 |
|
2024 Pledge Member

Join Date: May 2008
Real Name: Panos
Location: Athens, Greece
Watch: 16710
Posts: 8,704
|
Wow John, you took the loooong route but you did a great job
 Here is the shortcut : a piece of cloth in the edge of a table and a small but firm press An here is illustrated by the master himself http://www.vikbobil.se/bezel.html |
|
|
|
|
7 May 2014, 03:44 AM
|
#3 |
|
2024 Pledge Member
Join Date: Feb 2014
Real Name: John Baker III
Location: Spring,Texas
Watch: 1971 Red Sub
Posts: 2,221
|
PanosI:
On well used original Rolex parts, his technique works about 95% of the time; the other 5% just cause sore thumbs and trauma to the insert....I'm guessing on after-market parts, it only works 10% of the time.... Ask me how I know..... !!
|
|
|
|
|
7 May 2014, 03:49 AM
|
#4 |
|
"TRF" Member

Join Date: Mar 2013
Location: Chevy Chase
Watch: WG Daytona
Posts: 1,088
|
I don't know why it was not designed to push from the bottom.
|
|
|
|
|
7 May 2014, 04:51 AM
|
#5 | |
|
2024 Pledge Member
Join Date: Feb 2014
Real Name: John Baker III
Location: Spring,Texas
Watch: 1971 Red Sub
Posts: 2,221
|
Quote:
BRILLIANT IDEA ! When you pressed the unit over the crystal, that could never make them separate! But it would make it easier to separate when you tried to pry the unit off the crystal.... This makes my head hurt....
|
|
|
|
|
|
7 May 2014, 05:45 AM
|
#6 | |
|
"TRF" Member

Join Date: May 2009
Real Name: Larry
Location: So Cal
Watch: Rolex GMT 1675
Posts: 5,084
|
Quote:
How much would it cost to get one of those presses? |
|
|
|
|
|
7 May 2014, 06:41 AM
|
#7 | |
|
2024 Pledge Member
Join Date: Feb 2014
Real Name: John Baker III
Location: Spring,Texas
Watch: 1971 Red Sub
Posts: 2,221
|
Quote:
Here is an eBay auction for the same one I bought; you will still need to machine 2 of the disks to fit your bezel/insert... Good luck! http://www.ebay.com/itm/Watch-Press-...item338e7beccf |
|
|
|
|
|
7 May 2014, 11:46 PM
|
#8 | |
|
2024 Pledge Member
Join Date: Feb 2014
Real Name: John Baker III
Location: Spring,Texas
Watch: 1971 Red Sub
Posts: 2,221
|
Quote:
"You can always count on Americans to do the right thingafter theyve tried everything else." - Winston Churchill
|
|
|
|
|
|
8 May 2014, 03:33 AM
|
#9 | |
|
"TRF" Member

Join Date: Dec 2006
Real Name: Richard
Location: Los Angeles, CA
Watch: TT DJ
Posts: 4,456
|
Quote:

__________________
Today, I believe my jurisdiction ends here... Lug Hole Lover® |
|
|
|
|
|
8 May 2014, 03:54 AM
|
#10 | |
|
"TRF" Member

Join Date: Oct 2010
Real Name: BondJamesBond
Location: The Algarve
Watch: Rolex or nothing
Posts: 3,928
|
Quote:
The most difficult bit is ro get the insert out of the bezel the first time. You just kill your thumb ends.
__________________
♛ 5-digit Rolex or nothing ♛ 16030, 16613, 16713, 18038. |
|
|
|
|
|
8 May 2014, 09:23 AM
|
#11 | |
|
2024 Pledge Member
Join Date: Feb 2014
Real Name: John Baker III
Location: Spring,Texas
Watch: 1971 Red Sub
Posts: 2,221
|
Quote:
Last edited by JohnBaker3; 8 May 2014 at 09:23 AM.. Reason: typo |
|
|
|
|
|
10 May 2014, 05:32 AM
|
#12 |
|
2024 Pledge Member
Join Date: Feb 2014
Real Name: John Baker III
Location: Spring,Texas
Watch: 1971 Red Sub
Posts: 2,221
|
Hey Guys;
I forgot to mention that this same setup can be used to press the bezel/insert unit back onto the watch.... I put a small paper towel over them, align everything, and then press down. It makes a small crunch as it passes the crystal, but it saves the thumbs for a second time in the same day!
|
|
|
|
|
10 May 2014, 05:37 AM
|
#13 | |
|
"TRF" Member
Join Date: Dec 2006
Real Name: Richard
Location: Los Angeles, CA
Watch: TT DJ
Posts: 4,456
|
Quote:
__________________
Today, I believe my jurisdiction ends here... Lug Hole Lover® |
|
|
|
|
|
10 May 2014, 08:38 AM
|
#14 | |
|
2024 Pledge Member
Join Date: Feb 2014
Real Name: John Baker III
Location: Spring,Texas
Watch: 1971 Red Sub
Posts: 2,221
|
Quote:
|
|
|
|
|
|
10 May 2014, 09:50 AM
|
#15 |
|
"TRF" Member
Join Date: Dec 2006
Real Name: Richard
Location: Los Angeles, CA
Watch: TT DJ
Posts: 4,456
|
Well, a "crunch" would make me nervous but I'm certainly not going to second-guess Jocke...
__________________
Today, I believe my jurisdiction ends here... Lug Hole Lover® |
|
|
|
|
10 May 2014, 11:51 AM
|
#16 |
|
TRF Moderator & 2024 DATE-JUST41 Patron

Join Date: May 2007
Real Name: Larry
Location: Mojave Desert
Watch: GMT's
Posts: 43,159
|
I like the way you think
I just cut the bezel until it's a drop-fit.. It won't stay in, but it sure is easy.. 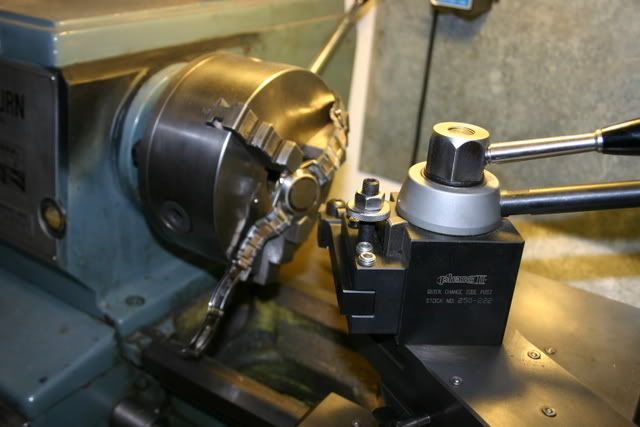
__________________
(Chill ... It's just a watch Forum.....) NAWCC Member |
|
|
|
|
12 May 2014, 10:54 PM
|
#17 | |
|
2024 Pledge Member
Join Date: Feb 2014
Real Name: John Baker III
Location: Spring,Texas
Watch: 1971 Red Sub
Posts: 2,221
|
Quote:
Now THAT is a "manly" lathe !!
|
|
|
|
|
|
19 May 2014, 10:04 AM
|
#18 |
|
2024 Pledge Member
Join Date: Feb 2014
Real Name: John Baker III
Location: Spring,Texas
Watch: 1971 Red Sub
Posts: 2,221
|
OK Larry:
Here are some pics of the "mini-lathe" at work milling down another nylon disk. Since I bought the case-back press, I have found 4 uses for it: 1: Pressing on case backs after battery replacements (non Rolex : ) 2: Pressing bezel inserts into the bezel 3: Pressing the insert/bezel unit onto the watch 4: Pressing down a crystal ring around a crystal This is a very practical piece of gear for the price!
__________________
As I've grown older, I've learned that pleasing everyone is impossible, but pissing off everyone is a piece of cake. 
|
|
|
|
|
24 July 2014, 07:09 AM
|
#19 |
|
2024 Pledge Member
Join Date: Feb 2014
Real Name: John Baker III
Location: Spring,Texas
Watch: 1971 Red Sub
Posts: 2,221
|
Hey Guys:
After rooting around on the internet, I found this little gem for sale. It is a genuine Rolex mini press used to put on crystal rings and bezel inserts. It uses aluminum cups rather than nylon.... Only difference is they are asking $6K for theirs; mine was about $40...go figure..... 
__________________
As I've grown older, I've learned that pleasing everyone is impossible, but pissing off everyone is a piece of cake.
|
|
|
|
|
24 July 2014, 07:29 AM
|
#20 |
|
"TRF" Member
Join Date: Dec 2006
Real Name: Richard
Location: Los Angeles, CA
Watch: TT DJ
Posts: 4,456
|
I use a tilting machinist vise with plastic dies; works great...
__________________
Today, I believe my jurisdiction ends here... Lug Hole Lover® |
|
|
|
|
25 July 2014, 01:23 AM
|
#21 |
|
"TRF" Member
Join Date: Nov 2011
Location: in a house
Posts: 537
|
I think the real reason the aluminum inserts are so difficult to install is that being a soft material, the repeated action of pressing it in and pressing it out makes the aluminum grow a tiny bit each time. thus it becomes more difficult as the insert is repeatedly installed.
I've noticed this with my lv insert as I used to swap it and a nos black insert all the time with just thumb pressure: now both are impossible without a press. |
|
|
|
|
25 July 2014, 02:28 AM
|
#22 | |
|
2024 Pledge Member
Join Date: Feb 2014
Real Name: John Baker III
Location: Spring,Texas
Watch: 1971 Red Sub
Posts: 2,221
|
Quote:
Take a small Perrier bottle and set the insert over the neck. Gently massage it in a downward motion. It may take several tries to get it just right. This will make the insert "dome" upward slightly and make it fit better into the bezel. If you have the opposite problem, and your insert is too loose, lay it flat on the table and massage it slightly flatter !
__________________
As I've grown older, I've learned that pleasing everyone is impossible, but pissing off everyone is a piece of cake.
|
|
|
|
|
|
25 July 2014, 10:00 AM
|
#23 |
|
"TRF" Member
Join Date: Nov 2011
Location: in a house
Posts: 537
|
I'm not sure the angle of the insert is the issue for me, the insert has grown longer, as evidenced when it's down to the last bit, and the insert is simply too large to squeeze into the bezel.
At least that's how mine appear: I've stopped swapping them around. |
|
|
|
|
25 July 2014, 10:50 AM
|
#24 |
|
"TRF" Member

Join Date: Apr 2013
Location: USA
Posts: 17
|
Put the insert in the freezer for a half hour and heat the bezel in hot (almost boiling water) Cold insert shrinks, hot bezel expands, all drop into place. Let sit to room temp and done. Pressing in the insert with a press could easily gall the edge of the insert or shave material from it. The difference in sizes with the insert cold and the bezel hot will allow the insert to easily drop in with no "interference" in the fitting.
|
|
|
|
|
25 July 2014, 12:46 PM
|
#25 | |
|
"TRF" Member
Join Date: Nov 2011
Location: in a house
Posts: 537
|
Quote:
|
|
|
|
|
|
25 July 2014, 10:49 PM
|
#26 | |
|
2024 Pledge Member
Join Date: Feb 2014
Real Name: John Baker III
Location: Spring,Texas
Watch: 1971 Red Sub
Posts: 2,221
|
Quote:
This works on steel valve seats and aluminum engine heads but not on a Rolex insert/bezel. I think the aluminum returns to temp so quickly that it never has a chance. For what it's worth, I tried this before I made the "mini-press". No problems with galling either; the aluminum is very soft and either goes in smoothly or with a soft click. Life is good.
__________________
As I've grown older, I've learned that pleasing everyone is impossible, but pissing off everyone is a piece of cake.
|
|
|
|
|
|
27 July 2014, 03:54 AM
|
#27 |
|
2024 Pledge Member
Join Date: Feb 2014
Real Name: John Baker III
Location: Spring,Texas
Watch: 1971 Red Sub
Posts: 2,221
|
OK....I admit that I have a SMALL problem with Rolexes in general and GMT's in particular.
I REALLY enjoy swapping out the inserts to take advantage of the many looks that they provide. The little zip lock baggies help keep them sorted and inventoried !! Pepsi, Coke, Root Beer, Blueberry, and Black Coffee are up for grabs! I just ordered several extra bezels so the swap is even easier !! Life is good !!
__________________
As I've grown older, I've learned that pleasing everyone is impossible, but pissing off everyone is a piece of cake.
|
|
|
|
|
27 July 2014, 11:07 AM
|
#28 |
|
"TRF" Member
Join Date: Nov 2011
Location: in a house
Posts: 537
|
love the shot of your workbench, and yes, you have gmt-istis bad, lol.
|
|
|
|
|
28 July 2014, 05:53 AM
|
#29 | |
|
2024 Pledge Member
Join Date: Feb 2014
Real Name: John Baker III
Location: Spring,Texas
Watch: 1971 Red Sub
Posts: 2,221
|
Quote:
__________________
As I've grown older, I've learned that pleasing everyone is impossible, but pissing off everyone is a piece of cake.
|
|
|
|
|
|
28 July 2014, 10:02 AM
|
#30 |
|
TechXpert

Join Date: Jun 2009
Real Name: Rik Dietel
Location: Seminole Fla
Watch: 5512 s/s Sub
Posts: 1,818
|
Guys Guys Guys you're hurting my head just buy a set of plastic jaw pliers from any good supply house for less than 20 bucks you snap the insert in till the one little side that wont go in take the pliers and roll it in takes less than 10 seconds to change an insert. Rikki
__________________
Century 21 Certified watchmaker Omega Service Provider Trained Omega OWME Certified. Rolex Parts Account Holder. |
|
|
|
 |
| Tags |
| insert bezel , install |
| Currently Active Users Viewing This Thread: 1 (0 members and 1 guests) | |
|
|


*Banners
Of The Month*
This space is provided to horological resources.


 Linear Mode

